


Basics Terms that Helps to Migrate Exchange to Office 365
In an organization or in a business, if you are thinking of upgrading or migrating from your Exchange Server 2003 to Exchange 2010 on-premise, then it is better considering a move to cloud based Office 365 service. The type of migration you perform on your Exchange, depends on your existing email system i.e., the number of mailboxes that need to be migrated, all / particular number of mailboxes that need to be migrated in your on-premise organization or cloud.
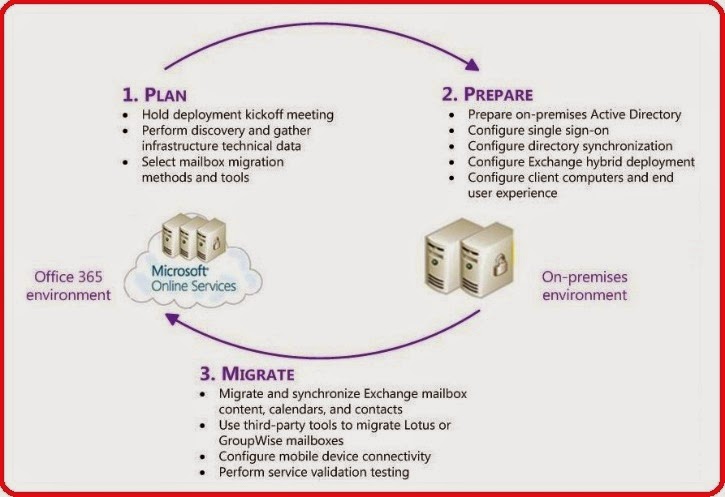
fig 1: Office 365 Migration
On-Premise Exchange to Office 365 Migration: 5 Considerations
- Active Directory Synchronization (All Mailbox of Exchange should migrate into Office 365, so all mailboxes of Outlook user need to be created when you go online for Office 365).
- Public Folder Synchronization (same as shared file system, you can access the Public folder by using Outlook on Exchange. However, Office 365 does not support public folder, so you can use SharePoint as a collaboration. The Exchange is not a collaboration platform, it’s an email server platform)
- Security and routing (Email security, Anti spamming filters)
- Calendar Sharing.
- Manage Archive Folder.
How to Migrate Exchange to Office 365
A different type of migration is carried out for different version of Exchange. They are as:
- Remote move migration (supported by Exchange Server 2010 and later versions)
- Staged migration (supported by Exchange Server 2003 and Exchange Server 2007 only)
- Cutover migration (supported by Exchange Server 2003 and later versions)
- IMAP migration (supported by Exchange and other email systems)
This method enables migration from a deployment of Exchange 2010 or later versions, by using the Microsoft Exchange Mailbox Replication Service (MRS) Proxy service.
Staged Migration
This procedure allows migration to be performed from an on-premise Exchange 2003 or Exchange 2007 deployment. The main difference in this migration is that it is focused at customers who wish to create a permanent mail with Exchange On-premise and their Exchange online environments. For this requirement, the customers deploy directory synchronization when they deploy Exchange Online. Customers with Enterprise Exchange licenses are only allowed to perform this migration.
Cutover Migration
This type of migration is for the users who wish to migrate their whole environment in one time. This migration is for small business to medium size businesses, which use Exchange 2003 or later version environment because by this less than 2000 mailboxes can only be migrated. This migration only supports customers who are using the Microsoft Exchange Autodiscover service instead of Exchange 2007 (or later-version) environments to find out the mailboxes that are available for migration. If you have Exchange 2003, for migration you can enter RPC proxy address manually to access the Exchange Mailboxes.
You can move your mailbox or migrate Exchange to Office 365(Exchange Online) in two possible ways:
Manual Move
Use PST files to manually move data from on-premise Exchange 2003 to Exchange Online. It becomes pretty easy when you don’t have too many mailboxes to move which saves a lot of time. But, you cannot migrate delegates and permissions by using PST files.
Use PST files to manually move data from on-premise Exchange 2003 to Exchange Online. It becomes pretty easy when you don’t have too many mailboxes to move which saves a lot of time. But, you cannot migrate delegates and permissions by using PST files.
Automated Move
By using automated move, mailboxes are moved online from the on-premise Exchange Server 2003 environment. It is the easiest way to move mailboxes by this method because it does more work in advance. There are two methods to automate a move, i.e. Move Mailbox Option from the Exchange Control Panel and by using the Directory Synchronization Tool.
Note: These options are available for Exchange 2003, 2007 and 2010. But here I have explained Exchange 2003 to Office 365.
Manually Move Mailboxes
It is a very simple and easy way, manually move mailboxes from Exchange to Office 365. On Exchange 2003, PST files will be there for all mailboxes. You can achieve this by using ExMerge tool that allows you to export Mailbox data from Exchange Server 2003 directly into PST files. If you have all the PST files, now connect them appropriately to the user’s Outlook and import them into their mailboxes. Now wait until you get the message “all folders are up to date” in Outlook 2007 or 2010. After completion, decommission Exchange 2003. Now use cloud service Office 365 by Microsoft.
The proper order of steps have been given below:
- Subscribe to Office 365 and register your primary SMTP domain.
- Register the Autodiscover DNS entry in your public DNS.
- Create the user Mailboxes in Office 365.
- Change the MX (Mailbox Exchange) records to Office 365 so that the inbound mail from the Internet is delivered into the Office 365 mailboxes.
- Configure the Outlook 2007/2010 mailboxes to use Office 365.
- Export the Exchange 2003 mailboxes to PST files.
- Import the PST files into the corresponding Office 365 mailboxes.
- Decommission Exchange 2003.
Automated Move
In Office 365, an automated tool is available by the name; Exchange Control Panel. By using this tool, you can simply migrate your existing Exchange 2003 or higher environment into Office 365.Also called the Cutover Exchange Migration.
Note: Hybrid configuration or Directory Synchronization is not same as Cutover Migration.
Steps for Automated Move
1. SMTP Domain Settings
Steps for Automated Move
1. SMTP Domain Settings
While configuring and provisioning of SMTP domain settings of DNS also visible to you.Note down this info, but not configure at this moment because all activity is still handled by Exchange 2003.
 fig 2: SMTP Domain Settings
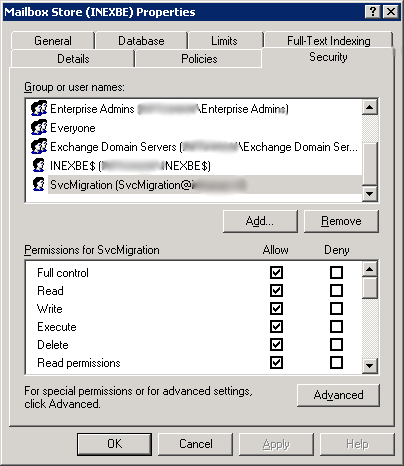
2. Mailbox Store Properties
2. Mailbox Store Properties
Grant permissions
3. In ECP navigate to “Manage my Organization” and click on E-mail Migration
Now lets start with the migration tool, sign in as the Exchange Online admin and move to the options page (Exchange Control Panel). In ECP locate to “Manage my Organization” and click on E-mail migration: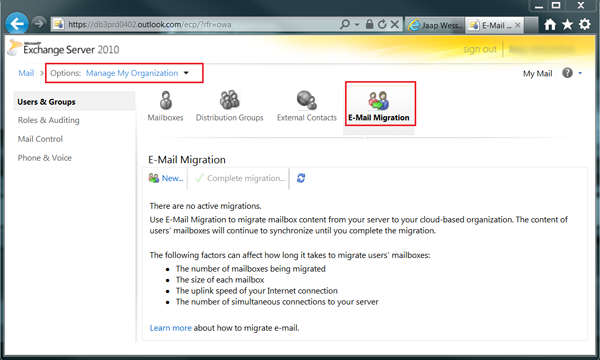
4. E-mail Migration Settings
Since here Exchange 2003 is used, so no Autodiscover functionality in the On-premise Exchange will be available. You have to do the settings manually.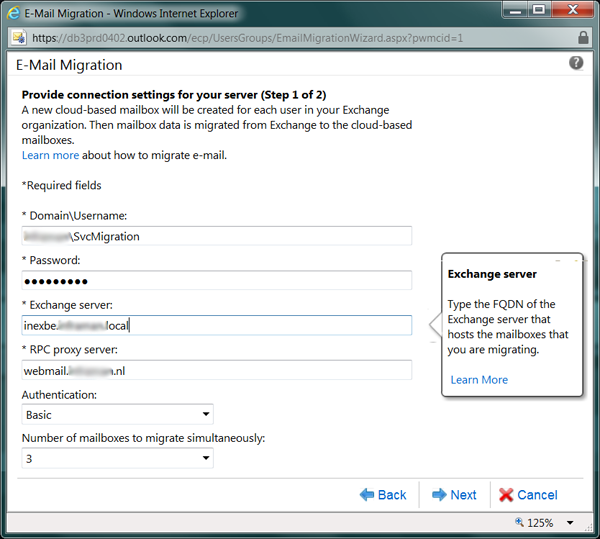
fig 5:E-mail Migration Settings step1
Here, enter service account information and Exchange Server(mailbox host server) and the RPC proxy server(for Outlook Anywhere).
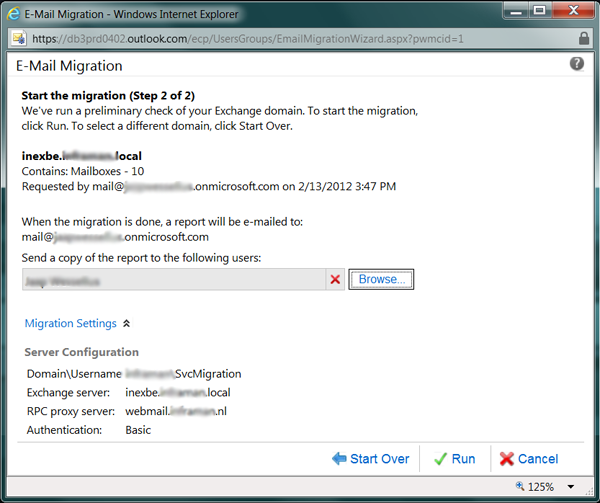
If all settings are all set, then click on Run which starts the migration process. This will create mailboxes, contacts and other data in Exchange Online. After creation, the tool uses the Outlook Anywhere to sign into mailboxes and copy data from Exchange 2003 Sever mailboxes to Exchange Online mailboxes. The time duration to do this depends on the amount of data.
5. Active E-mail Migration
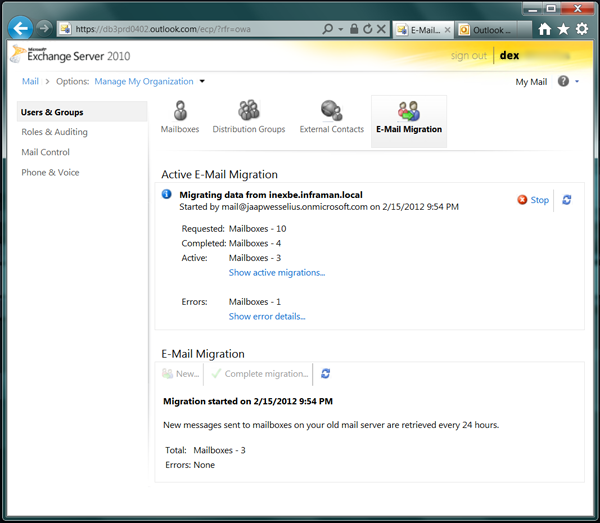
fig 7:Active E-mail Migration
By clicking on “Show Active Migration”, you may visualize the detailed information about migration any time. After its completion, you will be acknowledged about the same by an email.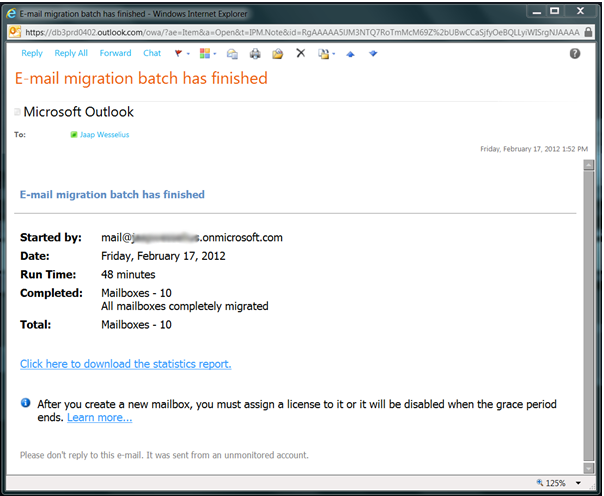
fig 8:Acknowledgement mail
fig 8:Acknowledgement mail
All information is copied from on-premise Exchange 2003 to Exchange Online (Office 365). Still the On-premise is in an active environment. All new mails are delivered to Exchange 2003 users connected to this on-premise environment. Actually new synchronization is performed, once in every 24 hours, by migration tool, to keep the environments updated.
6. Assign licenses
6. Assign licenses
Before finalizing the migration process, you have to enter details into the management console related to the newly created users. Details like: Login status, the user’s location, assigned roles, and the most important; licensing options settings are to be provide:
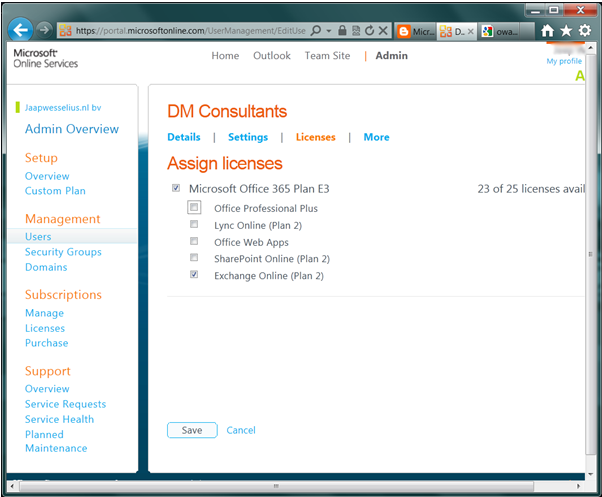
fig 9:Assign licenses
fig 9:Assign licenses
Finalize Migration
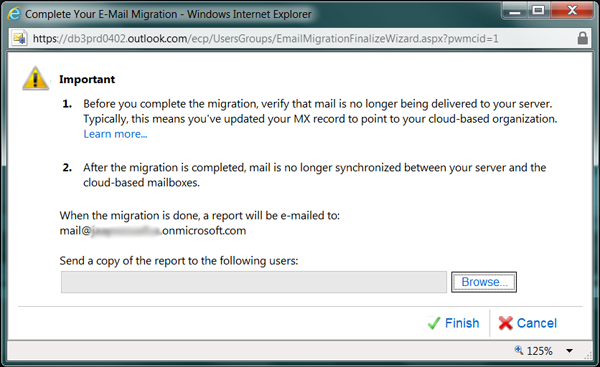
At last, the migration has to be finished which is the ‘cut-over moment’. To achieve this, take the following actions:
- Set Autodiscover record, SPF record and MX records to point towards Office 365. By doing this, new SMTP messages are not delivered on to the Exchange 2003 on-premise environment, but are delivered directly to the Office 365 environment. The information is on the Microsoft Online Portal.
- Again configure the E-mail clients to use the Office 365 mailboxes;
- Finalize the Exchange migration.
fig 10:Finalize Migration
At this stage, all contents of mailboxes are now copied to the appropriate Exchange Online Mailboxes. And no mails are delivered to the Exchange 2003 on-premise. Now you may decommission the Exchange 2003 environment.
Conclusion :
Therefore, this article describes the basic steps of migration from Exchange 2003 on-premise to the Office 365 which is known as a Cutover Migration. You can easily follow above steps and copy your data on the cloud. But some times there is risk of data loss ,for this you can use any tool for Exchange to Office 365 Migration Utility.
Therefore, this article describes the basic steps of migration from Exchange 2003 on-premise to the Office 365 which is known as a Cutover Migration. You can easily follow above steps and copy your data on the cloud. But some times there is risk of data loss ,for this you can use any tool for Exchange to Office 365 Migration Utility.
Thanks for Reading
Tej Pratap Shukla
Exchange Server Expert
Read My Previous Blog: Exchange 2010 Mailbox Backup & Recovery with Window Server Backup
Read My Next Blog: Quick Guide to Configure DAG Networking with MS Exchange 2010
Tej Pratap Shukla
Exchange Server Expert
Read My Previous Blog: Exchange 2010 Mailbox Backup & Recovery with Window Server Backup
Read My Next Blog: Quick Guide to Configure DAG Networking with MS Exchange 2010


0 comments:
Post a Comment
Post a reply