


Exchange server is one of the most popular Mail server preferred by professionals for data sync and local communication purpose. To setup Exchange server in an Organization some basic tips are required that administrator should clear before moving on the installation process. Because Many of them face Common problems while installing the Exchange Server 2010. There is a quick guide to setup Exchange Server 2010 without facing any difficulty.
Exchange Server Installation Guide:-
Preinstallation requirement:-
1) Install any of the 64 bit operating system (Window server 2008 R2 ):-
Configure static IP in it :- Click on the Start >> Control
Panel >> Network
and Sharing Center>> Change Adapter Setting >> Select your connection and right click on it and
open properties>>Click
on Internet Protocol Version 4(TCP/IPv4) and then click on properties. This is
the first phase to setup Exchange server 2010
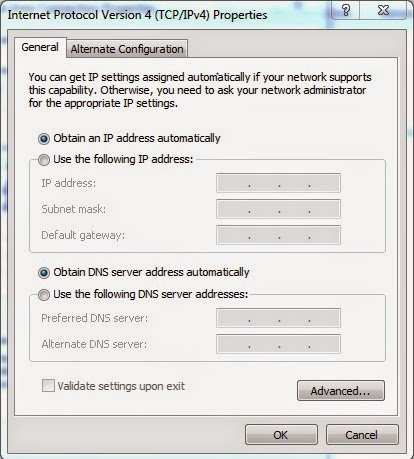
- Click on Use the following IP address and assign the static IP that you want.
- Activate the autoupdates:- Start >> Window Updates >> Change Setting >> Important Updates >> Recommended Updates >> Click on Give me recommended updates the same way I receive important updates and then Click Ok.
Install active Directory( Most Important step to setup Exchange server 2010):-
Start >> Administrative Tools >> Server Manager >> Click view network connection >>Right
click on Private Adapter >> Open Properties >> Select Internet Protocol version 4(TCP/IPv4) >> Copy IP address of address box and paste in
Preferred DNS server box (click Ok.
- Server Manager >> Roles >> Add Roles >> Click Next >> Select Active Directory Name Service >> Click on install
- Server Manager >> Roles >> Check the box of Active Directiry Lightweight Directory Services >> Click Next >> Finish
- Server Manager >> Features >> Add Features >> Click on Window Process Activation Service >> click Next >> Install
- Service Manager >> Add Role >> Click on the Server Role >> Select IIS Web Server >> Click next >>Finish
2) Setup
Exchange Server 2010.
3) Enable
Net.Tcp Port Sharing service.
- Service Manager è Services è Net.TCP Port Sharing Services è Make it Automatic in the Startup Type
Post Installation Steps to Setup Exchange Server 2010:-
- Open the Exchange Management Console (EMC).
- Expand the Microsoft Exchange with which Server Configration, Tool box, Organization Configration can be easily seen and managed.
- Now in the console hierarchy go to the Organization Configration then Hub Transport and then open the tab Remote Domains properties by right clicking on it.
- Now go to the Message Format tab and select the Allow Automatic Replies, Allow Automatic Forward, Allow Delivery Report and then click on Ok.
- Now swich to the Accepted Domain Tab and click on New Accepted Domain to set up new domain and fill the required details and click on finish
- Now make it a Default domain by right clicking on the domain and click on set as default.
- Now in the E-mail Address Policies open new email address policy available in the action menu.
- In the Introduction Part put your company name or anything that you want and click on Next.
- In the Condition menu Select the condition and then click on next
- In the Email address field add the Email Address.
- In the Select window click on the Immediately and press Next button
- Then click on finish.
Adding Signature :-
- Go to Organization Configration è Click on Transport rule tab
- Type anything like a Signature in the introduction window, also select the Enable rule.
- In the condition part click on From users that are inside or outside the organization and then click on Next
- In the Action part select Append Disclaimer Text And Failback To Action If Unable To Apply
- Now click Next è Next è Finish
After completion of Exchange Server 2010 Setup, Create the Send Connector :-.
- Send connector è New send Connector
- In introduction part type NAME and click on internet from the select the intended use for this send connector and click next
- In the address part click on the Add button and then type * and select Include all subdomains and click ok, then next
- Now in the Network setting part click on Use domain name system MX records to route mail automatically and select Use the external DNS lookup setting
- In the source part click on Add Servers.
- Click on New in the New connector window and then click finish.
Conclusion:-
The above steps will help you a lot to setup Exchange server
2010, This Exchange server Installation guide is created for the users facing
problem in installing the Exchange server.


0 comments:
Post a Comment
Post a reply