Hello everyone, today we are going to discuss about creating shared user mailbox in Exchange Server 2010 using PowerShell. After the creation of shared mailbox, we will add users to it with which mailbox items will be shared. It’s really a good idea to create a shared mailbox if you are working on a project as a team, then you must use this kind of solutions to always keep each information shared with team. We are going to discuss it in steps and each step processes are displayed in pictorial representation.
- Go to Start, type Exchange, and select Exchange Management Shell (EMS) from the displayed list of Applications. Wait for the shell to start it properly. Type the command shared below, to create shared mailbox. You can see example of running command in fig 1 for reference.
-
After the successful execution of command, shared mailbox has created with the name of sharedmailbox according to the given mailbox name. Go to start again, type Exchange, and select Exchange Management Console (EMC) from the list of apps. You can see fig 2 for reference.

Figure 2: Exchange Management Console -
In EMC expand Microsoft Exchange On-Premises root of tree, expand Recipient Configuration, then select Mailbox, and at center in result pane, select the new created shared mailbox. In my case, the new-shared mailbox is sharedmailbox. Right click on that mailbox and click on Manage Full Access Permission. You can see fig 3 for reference of this step.

Figure 3: Select Shared Mailbox -
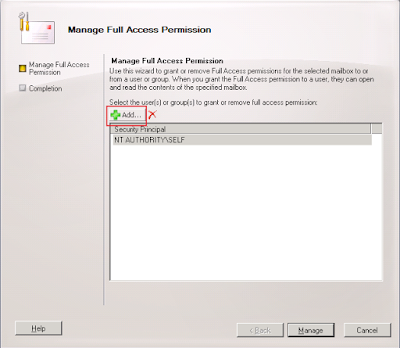
Now you will see Manage Full Access Permission window. Click on Add button in this as displayed in fig 4.

Figure 4: Manage Full Access Permission Wizard -
Now you will see Select User or Group – Entire Forest window. Here you will see all available mailboxes of your domain. Select user/group mailbox with which you want to share the created mailbox and click on OK button. You can see its image displayed in fig 5. Keep repeating the process until you don’t add all mailboxes with which you want to share data and information.

Figure 5: Select User or Group - Now you will see a list of added user mailboxes. Just click on Manage button as displayed in fig 6 and wait sometimes for the wizard process completion.

Figure 6: Manage - After the process completion, you will see a message: ‘The wizard completed successfully’. Click on Finish button to close the wizard. You can see fig 7 for reference of this step.

Figure 7: Finish Access Permission Wizard - Now login to OWA, right click on the root folder as displayed in fig 8 and click select Open Other User’s Inbox.

Figure 8: Open other User's Mailbox - Now you will see a new window Open other user’s Inbox has opened. In the text box, just type new created shared mailbox name and hit enter button and then click on OK button. You can see fig 9 for reference of this step.

Figure 9: Open Shared Mailbox - Now you will see new mailbox at left panel in OWA as displayed in fig 10. Do the same process in other user’s mailbox. Now you can put any email in this mailbox and that will be shared with all associated users.
Figure 10: Shared Mailbox
Conclusion
In this blog post, we discussed how to create shared mailbox in Exchange Server 2010 using PowerShell. The same solution also works for Exchange server 2013 & 2016. You can change the type of mailbox later from Shared to Regular or Room or anything else. But in case of corrupt then first repair corrupt exchange mailbox & then go for any change. In case of any doubt just leave a comment in the provided section.


0 comments:
Post a Comment
Post a reply