


There are many users who are facing some issues while moving users from AD. They are looking for an easy and relevant solution to migrate users from AD/Active Directory. In this blog, we will discuss three different methods to export users from Active Directory. Each method will create the same CSV file. If you want a quick solution, then it is recommended to use PowerShell method.
Export users from Exchange 2013 or Office 365 using Exchange Admin Center
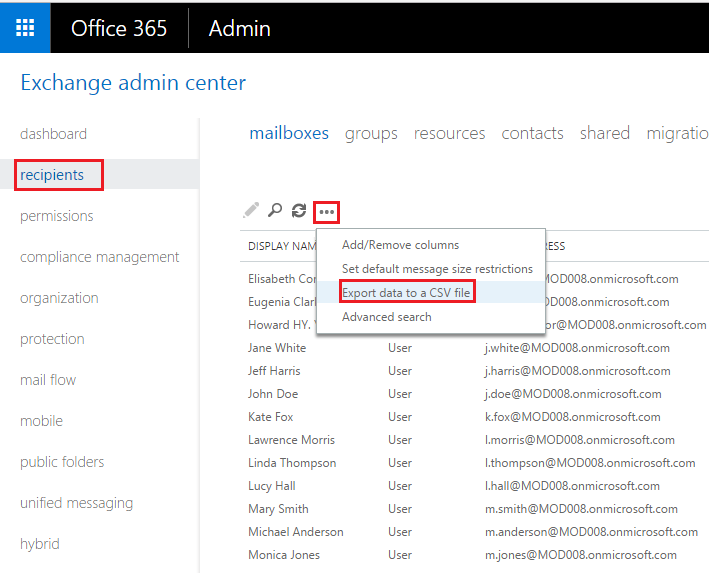
If you need to export users from Exchange 2013, Exchange 2016 or Office 365, you can also use Exchange Admin Center. The steps you need to take are as follows:
- Access Exchange Admin Center (EAC).
- Go to the Recipients tab and click on More options and select Export data do CSV file.
- Now, select the columns to export to CSV file.
- Click Export.

- Open the exported file in Excel, it will be marked with some commas in one column. Edit it by using a function Text to Columns and follow the wizard.
- Now, copy the recently exported data into the spreadsheet. Do not fill the empty fields and leave them. Only fill User Name & Display Name.
- Steps to create the migration batch CSV file is almost same. Instead of 15 headers, there are only 3 i.e. EmailAddress, Password, and ForceChangePassword. Do not leave the Email field blank.

Export Users from Exchange 2003-2016
- First, access Active Directory Users and Computers by following steps: Start menu >> Administrative tools >> Active Directory Users and Computers:
- You will get a AD administrative tool. Select your domain name >> Users.
- Now, there will be a list of users along with a Security and distribution groups. You can apply filters to select a few. Select show only the following types of objects and check Users and click OK.
- Now, select the attributes to export to the .csv file. To create a migration batch, only 3 columns are needed: EmailAddress, Password, and ForceChangePassword. To create users in Office 365, the CSV file will need some more columns. There is a template provided in Microsoft Office 365 Admin Centre with all the required headers. Go to view >> Select Add/Remove Columns
- Select a name and email address to create a migration batch, or the attributes to add users in O365. All the attributes were not listed from the previously mentioned template file so, you will have to edit this CSV file manually.
- Move the users by clicking on the Export list in the top menu. Name the new file and save it in *.csv format only.


Export users from Active Directory using PowerShell
A much quicker and easy way to accomplish this migration task can be done by using the PS commands. The cmdlet is given below to export a complete list of users to a CSV file.

Summary
The above article explained the solutions to export users from Active Directory. All the 3 solutions are easy to perform and result to create a CSV file. The user can easily export single or multiple users from Active Directory.


0 comments:
Post a Comment
Post a reply