


The instant messaging service is the fastest way to communicate with our official clients working in the organization. The Office 365 is the web-based service developed by Microsoft that provides online Office suite under a single account. It also has feature to add Lync i.e. the instant messaging client that Office 365 users to communicate with each other. The blog will be discussing to guide users about how to Use Lync Online in Office 365 & how they can configure it in existing Office 365 account.
About Lync and Office 365
The Lync is a component of Microsoft’s Unified Communications solution that provides features for instant messages, voice calling, video calling, live meetings etc. under a single interface. It is the Instant messaging client used with Skype for Business Server. It is also known as replacement for Windows Messenger that was earlier used with MS Exchange Server. The Lync provides several Business benefits such as it keeps the users stay connected, easy to use interface provided, Better customer care, supports multiple devices PC, iOS, tablets, phones, and reduced costs. The Office 365 is the online service that allows the usage of various Microsoft Office applications under single interface on Windows system and OS X. It provides storage space on MS cloud storage space, OneDrive. The Lync service can be set up in Office 365 account by following the manual settings provided in Office 365.
How to configure Lync in Office 365?
Stepwise Procedure to setup Lync in Office 365 are as follows:- Go to login page of the Office 365 by visiting www.microsoftonline.com
-
Enter the account credentials of the Office 365 account.

Enter Credentials - After successful login, a screen will be opened with several options.
-
Click on Downloads under Resources on the right side of the screen.

Download Services - A page for Downloads will be opened having options such as Upgrade Office Professional Plus, Install MS Lync etc.
-
Go to Install Microsoft Lync, choose the preferred language option, and select the version 32-bit or 64-bit.
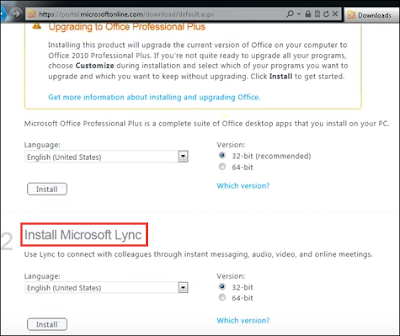
Install Microsoft Lync - Click on Install to start installing Microsoft Lync on Office 365.
-
A pop up window will be opened asking permission to make changes in the system.

Allow Permissions -
Click on Yes & Microsoft Lync 2010 Installer will copy the files to the user’s hard drive.

Microsoft Lync Installer -
A Windows Installer will notify the user that Lync is preparing to install.

Preparing to Install -
The Microsoft Lync setup window will be opened where user needs to click Install.

Microsoft Lync Setup -
A window will be opened asking user if they want to use Microsoft Update or not.

Use Microsoft Update -
Progress of Installing Microsoft Lync can be seen with the notification.

Lync Installation Progress -
Once the installation is done, click on Close button.

Installation Done -
Login page for the Microsoft Lync will be opened.

Login to Lync - Enter the sign-in address that is same as the one used on Office 365.
- Initially, while signing in another component is needed to download i.e. Microsoft Online Services Sign-in Assistant.
-
Click on Download and Install now option from the link provided in the login page.

Download & Install -
After downloading the service, click on Run to start installation.

Run Installation -
The Setup of MS Online service Sign-in Assistant will appear.

MS Online Service Setup -
Accept the License agreement by clicking the check box and Select Install.

Accept License Agreement -
Progress of installing Sign-in Assistant can be checked.

Progress of Installing Assistant -
After installation of the service is completed, Click on Finish button.

Installation Successful -
Again Go to the login page of Microsoft Lync and enter the credentials.

Login Page of Lync -
Now the user can successfully login to the Microsoft Lync.

Microsoft Lync - User can add any contact by typing the name of the contact in the search box and Press Enter.
-
After adding the contact successfully, the user can start using the services provided by the Lync such as instant messaging, Audio calling, video calling etc.

Lync UI to Use Services


Conclusion
The blog has been aimed to help the users of Microsoft Office 365 that provides online Office applications under single interface with the instant messaging service similar to Skype. The Microsoft Lync is the service that provides option for instant messaging, audio or video calling, live meetings etc. that can be installed in Office 365 account. Enabling the Lync service will let Office 365 users easily communicate with other users. This informative blog further discusses about the Microsoft Lync Instant messaging service and MS Office 365 service for providing online Office Applications. Stepwise procedure for Office 365 Lync manual Settings has been provided in the blog in order to guide users on how to Use Lync Online in Office 365.


0 comments:
Post a Comment
Post a reply